HOME
TOPICS
ABOUT ME
I got the best results when I tried two or three blending techniques and chose the one that seemed the most natural.
Al Fasoldt's reviews and commentaries, continuously available online since 1983
T e c h n o f i l e
Photomatix merges two images of same scene to improve exposure
May 30, 2004
By Al Fasoldt
Copyright © 2004, Al Fasoldt
Copyright © 2004, The Post-Standard
Professional photographers sometimes use a special technique to get a good picture out of a badly lit scene -- one that has both very bright and very dark areas. You can use this technique yourself using an extraordinary software program.
Here's the problem: When your camera takes a picture of a scene that contains both bright and dark areas, it's probably going to try to capture an average exposure; the bright areas won't be bright enough and the dark areas will be too dim to make out.
If you adjust the exposure to capture the bright areas properly, the dark areas will be hopelessly dim. Likewise, if you expose the dark areas right, the light areas will be almost featureless -- what professionals call "blown out."
The trick to getting an exposure that's perfect for both the brightest and darkest areas seems simple, but it's doggedly difficult to do without help. You simply take two pictures from an identical camera position, one that's overexposed and one that's underexposed.
Putting those two images together on your own, without specially designed software, is like assembling a new car by ordering all the parts. You have too many little things that can go wrong and you might spend days just trying to figure out what goes where.
But Photomatix, a new program from MultimediaPhoto of Montpellier, France, makes this trick of dual-exposure blending almost foolproof. Photomatix comes in both "Pro" ($99) and "Light" ($35) versions for both Mac OS X and Windows. You can buy the software directly from the company's Web site at www.hdrsoft.com.
I installed the OS X version of Photomatix Pro on my Apple G4. For my tests, I used several pairs of photos I'd taken at Fort McAllister, a restored Civil War defense fortress in southern Georgia.


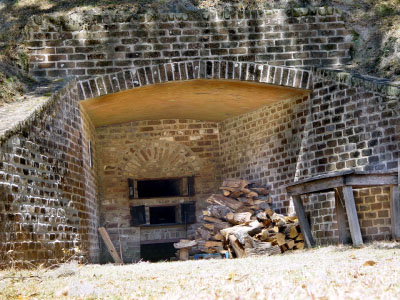
Images taken at Fort McAllister, Georgia, were blended into a properly exposed photo (third picture, below) by Photomatix, a photo editing program available for both Mac OS X and Windows computers. I took two exposures of the same scene (the first two images) and used one of the many exposure-blending modes in Photomatix to produce the result. Photomatix Light is $35; Photomatix Pro, which I used, is $99.
The day my wife and I visited the fort was bright and sunny. Some of the areas I wanted to photograph were brilliantly lit in some areas with deep shade in others. I couldn't have found a better location to test exposure blending.
You can see an example of what Photomatix Pro can do in the three illustrations accompanying this article. The scene shows a protective recess built into the fort where firewood was stored. The sun was directly overhead, with only reflected light illuminating the inside of the recess.
I used my Sony DSC-F707 digital camera's manual exposure controls to adjust the exposure of the first image so that the interior of the recess was just barely overexposed. Likewise, I adjusted the exposure of the second image so that the thick brick wall of the fort was slightly underexposed.
At home, I opened the two photos in Photomatix Pro and used one of the advanced modes, "H&S Intensive," to blend the two exposures. The result is the third image, a perfectly exposed portrayal of the scene.
Photomatix Pro has a variety of blending modes. Each scene is different, and I got the best results when I tried two or three blending techniques and chose the one that seemed the most natural. You can blend more than two images to create one scene, but two exposures usually work fine.
Photomatix Light and Photomatix Pro both automatically line up the images so they match, pixel by pixel. I was surprised to find that I got a reasonably good final image out of a pair of exposures taken slightly out of position -- apparently, my tripod had slipped in the sand between the first and second shot -- although Photomatix was not able to perform a miracle. My advice (to myself and others) is to anchor the camera as solidly as possible before taking any photos. It also helps to use the camera's automatic timer so that you can take the pictures hands-free.