HOME
TOPICS
ABOUT ME
Making wall size prints with a standard inkjet printer is easy and fun.
Al Fasoldt's reviews and commentaries, continuously available online since 1983
Make your own giant mosaic posters with an ordinary printer
Jan. 27, 2002
By Al Fasoldt
Copyright © 2002, Al Fasoldt
Copyright © 2002, The Post-Standard
Photos by Al Fasoldt
I had a tough time hanging an inkjet print of a picture I took in Paris. I couldn't find a picture frame big enough for it.
Don't laugh. My inkjet image was five feet wide by three feet tall.
I have a standard inkjet printer. How could I make a picture that big?
It was easy. I cheated. I made the huge photo one section at a time, then pasted the 8 1/2 by 11-inch pieces of this mosaic together to make a huge print. I call this method "mosaic poster printing."
Making wall size prints with a standard inkjet printer is easy and fun. I've done it four or five times now, and I'm getting pretty good at making mundane pictures into giant prints.
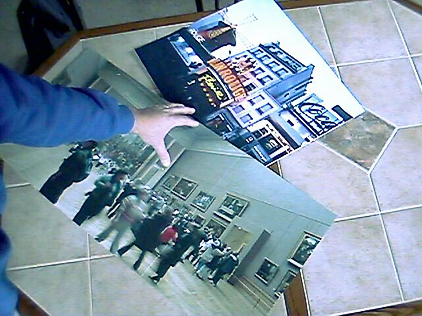
Author holds one of his smaller poster mosaics, with another small one nearby on the kitchen table. They both had a slightly stiff white cardboard backing.
Want to try it? All you need is the right software, a large table or clean floor where you can assemble the huge mosaic and, of course, a fully stocked inkjet printer, with extra ink cartridges in case you run out. It also helps to have a serious paper trimmer, the kind with a long, pivoting blade. (I bought mine at Office Max.)
I used Picture Window, one of my favorite image editors, to make the giant prints. Picture Window is a $50 program that is as good as Adobe Photoshop in some ways and much better in others. (Let that sink in. Photoshop costs $600 or more, depending on the kind of discount you can get, while Picture Window costs less than one-tenth that much. Yeow!)
You can download Picture Window from www.dl-c.com. There's also a "pro" version for $40 more. Check the description carefully, because you might not need the "Pro" version at all.
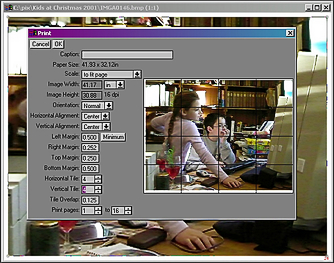
Print menu in the Picture Window software has been set for four tiles in both directions, for a total of 16 tiles. This photo of neighborhood kids Jessica Damiano and Tom Werth would be 41 inches by 30 inches.
 Picture
Window's mosaic poster function is almost hidden away.
You won't see it until you start the printing process.
As part of the last step before printing, you can choose a
tiled printout (by clicking "Horizontal Tile" and
"Vertical Tile") of just about any practical
size. (The frighten-your-puppy maximum setting is 12 feet
by 17 feet, taking up 400 sheets of paper. Try it if you
dare -- but only if you have a LOT of photo-quality printer
paper and a good supply of extra inkjet cartridges!.)
Picture
Window's mosaic poster function is almost hidden away.
You won't see it until you start the printing process.
As part of the last step before printing, you can choose a
tiled printout (by clicking "Horizontal Tile" and
"Vertical Tile") of just about any practical
size. (The frighten-your-puppy maximum setting is 12 feet
by 17 feet, taking up 400 sheets of paper. Try it if you
dare -- but only if you have a LOT of photo-quality printer
paper and a good supply of extra inkjet cartridges!.)Picture Window puts a small spillover margin around each page of the mosaic, called the Tile Overlap. It provides a little wiggle room so you can overlap one page (or tile) with its neighbor to provide a paste area. You can make the Tile Overlap larger than the default of one-eighth of an inch if you need more of a margin.
I'm still experimenting with ways to put my huge poster mosaics together.
I printed one giant mosaic on extra-heavyweight glossy photo paper and simply taped it together, putting the tape on the back of each seam, of course. (This isn't as easy as it might sound, because you have to flip the tile-by-tile mosaic over each time you tape another page onto it, or you have to lay down a strip of tape sticky side up and place the right-side-up mosaic on top of the tape.)
A few others got a more professional treatment. I made an underlay out of lightweight, white cardboard and used glue sticks to paste the page tiles to the cardboard base. This made the poster mosaic stiff enough to carry, and I could even mount it on a wall without a frame.
Everyone I've talked to about mosaic poster printing asks whether the seams between tiles are visible. You can see from the illustration here that they're hard to see. From a few feet away, they're basically invisible.